
The bed was taken apart at the beginning of this project. The floor and metal strips were rotted beyond repair, so they were discarded. The metal strips are available from a couple of places, I got mine at MAR-K . I bought their steel angle strips for ease of welding to the bed sides, and stainless strips, for long life outside. I plan to use white oak in the bed because its durable, and a local sawmill sells it cheap.
The good part about the box on this truck was that there was very little rust, unfortunately it had been cut to make way for a 4" x 6" wooden rear bumper. The box had also been outfitted with angle supports, because the tail piece that sits below the tailgate had been removed. The tail piece is usually bolted to the bottom of the rear pockets on the bed sides and keeps the rear of the box square.
After drilling out the spotwelds and removing the rear pockets and angle
strips, the bed and tailgate were
sandblasted.
Dennis Sherman has a great way to fix rear pockets. Since the rear pockets
on the bed were cut half way up, we decided it would be easier to remove
the bad pockets and weld new ones on. Where do you find replacement rear
pockets? Rather than trying to find good rear pockets, we decided to start
with a good set of front pockets, and make them into rear pockets. Since
the contour of the pockets is the same, the only thing that needs to be
done is reproduce the part that the tail piece bolts into. To do this we
matched up front pocket to a very rotted rear pocket that Dennis had, and
cut the pocket and bent it to resemble the rear pocket. Now that won't
work by itself because the metal isn't wide enough to meet all the holes
of the tail piece. So another piece of 16 gauge was welded on and drilled
to match the original. From the back you are starting with something that
looks like the number I and ending up with something that resembles the
letter L.

First picture after welding, don't worry it gets better.
Then the pocket is carefully lined up on the box side, and welded in place. we want to finish welding and assemble the box prior to painting, to see how it all fits. I'll install the hinges and tailgate, then attach the pieces that the tailgate chain fits into, on to the rear pockets to get the best fit. The angle strips will be welded in place as soon as I decide what thickness the oak will be, and measure up from the lip on the back tail piece to get the right fit.
Dennis came down and welded some holes by cutting out the rotted metal
and welding in new. We lined up the steel angle strips with enough room
for 3/4" oak. We ended up measuring down 20 inches from the top of the
bed and made marks to line up the bottoms of the strips to. The angle strips
had holes drilled in them and were mig welded through the holes. I chose
to use steel on the sides because it welds easier than stainless. The next
step is to grind the welds and assemble the box to see how it fits. I was
impressed on how well the angle strips from Mar-K fit, especially around
the wheel indentations. The 6 piece set sold for $126.00 in 1996. They
also sell wood, tailgate hinges (outer and center), and tailgate chains
for the Power Wagon.
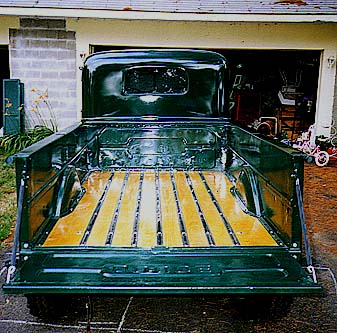
April 1997 picture of bed.

I used 3/4" white oak for the bed strips, white oak will resist the weather better than red oak. I finished the oak with 3 coats of a marine varnish on all sides. The oak planks were ripped and then rabbited so the stainless strips would rest below the top of the planks. I bought 7 stainless steel strips from MAR-K along with the hardware. One problem with the hardware was that the 1/2" bolts used to hold down the bed to the frame were too short. MAR-K didn't have the correct length ( I used 5 1/2") so I bought them from a local guy. I used a forstner bit to counterbore a hole in the oak for the washers that go under the 1/2" carriage bolt heads so the washers sit flush with the top of the oak planks.