I purchased the truck almost two years ago. I felt it was a good candidate for modifications as it had no engine or transmission. The drive line was complete from the transfer case back. It does have both doors, good windshield frame , plenty of dents but no rust outs. It also has a pickup box (no tailgate) and winch.
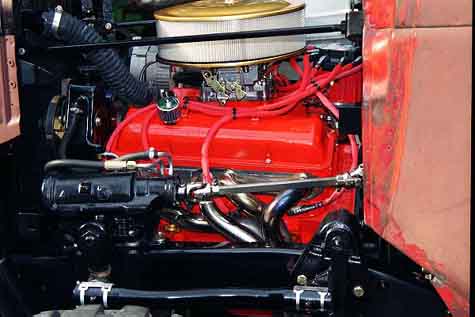
I found a 350 chevy motor with four bolt mains at the local junkyard and had it rebuilt with 10:1 compression ratio and a low end cam. Other goodies include a one wire alternator, HEI style distributor from performance distributors, 600 cfm Edelbrock carb, and JBS shorty headers. It has a 12" clutch and an SM465 transmission.

The power steering set up is tricky on the power wagon as the original steering gear mounts inside the frame. My first attempt was to locate the power steering gear near the original location,but on the outside of the frame, however, it didn't leave proper clearance/angle for the drag link . I then used M37 steering parts (which are much heavier than pw parts) consisting of the idler and links and moved the gear box forward as shown. Each link was cut, bent and welded back together (with a 7/8" bar inside).The gear box is a Saginaw '74-'78 reverse rotation from Benchworks (rebuilt). The power steering pump is a power pump from AGR (rebuilt). Snake River 4x4 provided the u-joints and shafts.
I rebuilt the front end with 4.89 gears and a locker(Veteran Vehicles).I also installed Ray Suiters' disk brake set up .
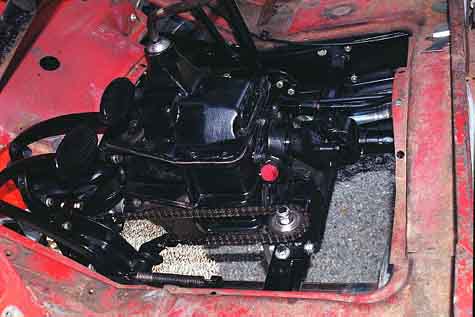
The transmission is mounted on a cross member made out of heavy wall 2x2 square tubing with a saddle in the center. I installed an early style bell housing with the "pads" on it intending to use the pw's rear engine mounts, but I didn't have the clearance for the clutch and brake. (I wanted to retain the original pedals and not use a hanging pedal assembly). The cross member has worked well giving clearance for exhaust routing and clutch and brake linkages. The clutch linkage consists of a size 40 chain idler mounted to the cross member and a chain from the original pedal, around the idler sprocket to the (shortened) clutch fork.
I started the motor about two weeks ago and things went pretty well. The steering worked fine - lock to lock with one finger. The clutch assembly seemed fine also, shifts ok with "normal" pedal pressure. The engine did run hot. I started it and after a quick timing adjustment brought it up to 2k rpm for 20 minutes ( per my rebuilders recommendation to run in the cam). The temperature hovered around 200 degrees . After the 20 min. I brought it back to idle and started to mess with the timing and it boiled over. I shut down, changed oil and filter and restarted later. Still runs at 200+ degrees.
I have a 15" flex fan on it now, but that only covers the lower portion of the radiator.I have since found a device called a water pump riser that will raise the water pump up 5" enabling me to run an 18" fan with shroud. I"ll post pictures of this set up if it works out.
Update I believe I have found the solution to the overheating problem. I
received a water pump riser from Vintage Air (after market air
conditioning specialists). It is an aluminum casting that bolts on in
place of thechevyv short water pump, raising the fan hub up 5
½". It takes a high volumechevyv six cylinder water pump. The
new fan location allowed me to use (their) 18 ¼" monster fan
with 6 blades and 2" pitch (1" forward /1" back).Now the fan "covers"
the entire radiator core
area. I’m using the original radiator without any shroud. I
started up again and this time the temp climbed to 200`,
thethermostatt opened and the temp settled down to 180` and never got
any hotter. This fan really moves a lot of air. All of my testing has
so far been done "at standstill" with no forward motion of the truck,
as I don’t have brakes or the rear end in yet. I believe that
anyone interested in a chevyv.) v-8 re-power should consider using
this water pump riser. The nice thing about this unit is that it has
bosses cast into the top of it for alternator and air conditioning
pump mounting. I already had made a mount for my alternator so I
didn’t use theirs, but I did mount a Sanden 505 ac pump on their
bracket. It looks as if a power steering pump would fit well also
in
place of an ac pump.(I already had made a mount for my power steering
also). Vintage Air has a web site at www.vintageair.com and you can
request a
catalogue on
line. I plan to install their air conditioning with heater/defrost .
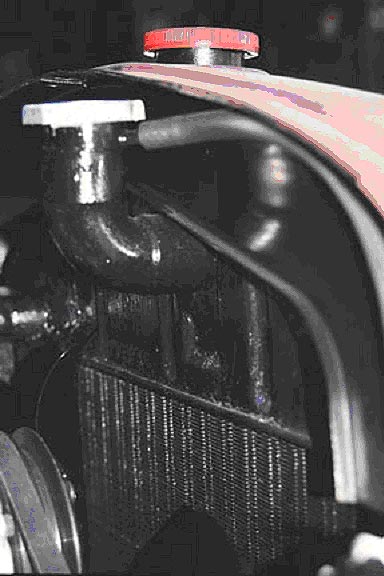
I now have a pressurized system with a 13 lb cap. I then installed an overflow tank, which removes all of the air from the system. The temperature gage now stays just below 180 degrees under varied driving conditions (and no more funny noises). I feel that anyone installing a V-8 in a power wagon should go with a pressurized cooling system. Shown below is the right front engine mount. I went with a bracket mounted to the front of the engine as opposed to the Chevy side mounts to utilize the original PW mount location. The bracket is offset on this side to clear the fuel pump. I used rubber pads (PW cab mounts from Robert’s Motor Co.) for the isolation pads. Both “tabs” are gusseted on the inside and grade 8 hardware is used throughout. The copper fitting shown makes the transition from the larger diameterchevyv hose to the smaller pw radiator hose via a reducer soldered into the 45º.
The motor is centered in the engine bay and sits level (laterally). Looking thru the hand crank hole in the radiator is seen the harmonic balancer retaining bolt (crankshaft centerline-same as the original engine). The engine/transmission is inclined back toward the transfer case with no noticeable angulations of the u-joints in the short shaft.